Building a Network Automation Lab Environment - EVE-NG Ansible
Table of Contents
Background#
Objective#
To setup a network automation lab environment, we will be connecting every node in our virtual EVE-NG topology to a Ubuntu Virtual Machine (VM), enabling us to launch network automation jobs via an open-source, command-line-interface (CLI) application known as Ansible.
Prerequisites#
- EVE-NG - A network emulator that runs real device images in a virtualized environment with a nice web-based-GUI
- Ubuntu VM - This will be the “brain” of your network automation lab. This is the device doing the “automating using ansible”
- Full connectivity between EVE-NG and your Linux VM
1.0 EVE-NG#
Assuming you already have an EVE-NG server installed, and have functional device images, This section will go over the specific steps on EVE-NG to set the stage for your network automation lab environment.
1.1 Virtual Machine Network Adapter Settings#
EVE-NG is an isolated environment by default, but it is possible to connect the virtualized nodes in your topology to a real network, such as your home LAN, or the Internet.
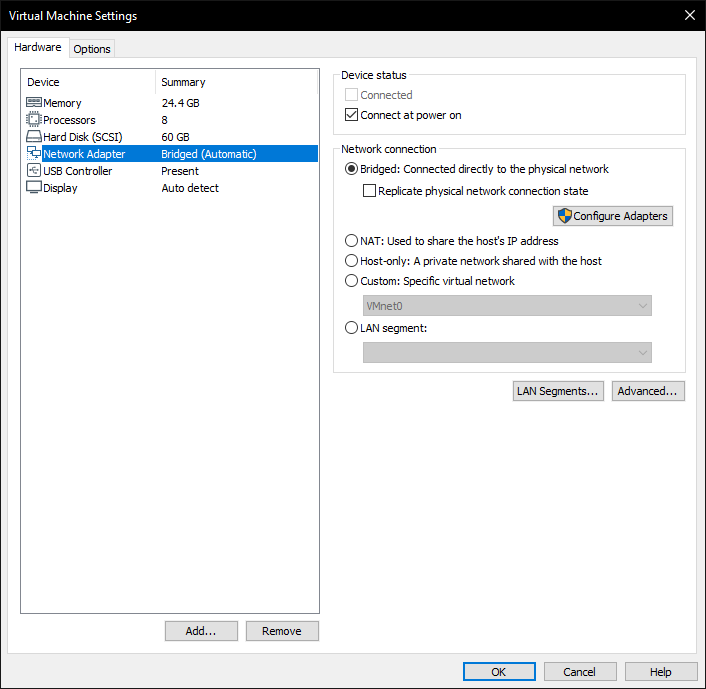
First, you will need to make sure that the EVE-NG VM itself is correctly set-up to bridge the virtual network the VM lives on to your real network.
This can be seen below using the popular Type-2 hypervisor “VMWare Workstation Player”
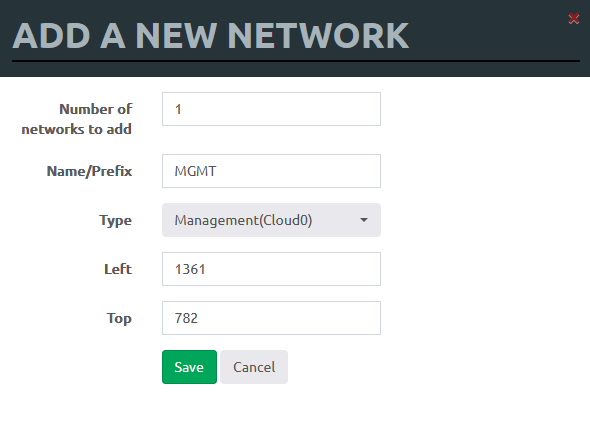
1.2 Create “Management Cloud0”#
We will now create an object in our lab topology that, when connected to, will bridge those devices onto your real network.
In the scenario of a home network, your home router will see these devices the same way it sees your PC, Phone, etc. If devices connected in this fashion are setup to receive an address via DHCP, it will receive one from your home router.
Within EVE-NG select “Add an Object” » “Network” » “Management(Cloud0)”
1.3 Connecting Nodes to Cloud0#
Now, connect Cloud0 to every device in your topology.
Below, I have reserved the first port on every device for this connection (Eth0/0)
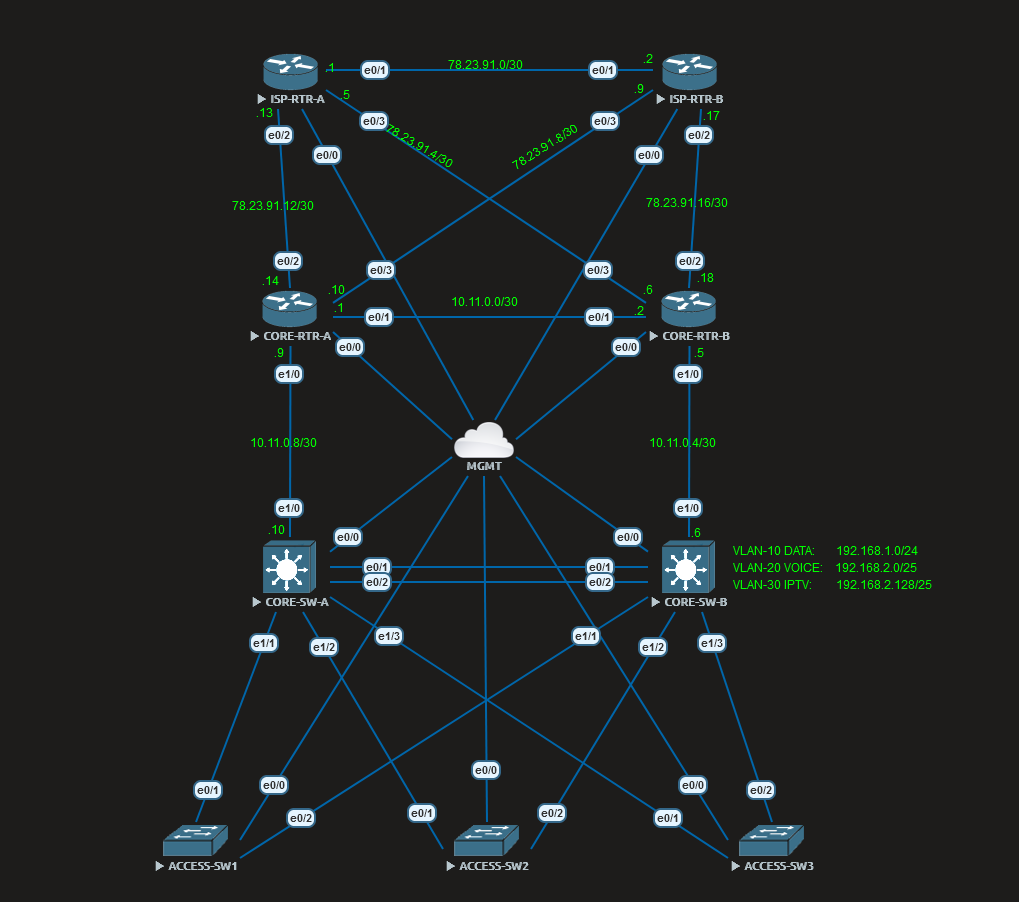
If you’d like, Click here to download an eve-ng template file for this lab, which can be imported into your server through the web-gui.
1.4 Configure Each Node for Remote Access#
Ansible uses SSH to interact with hosts, so we will need to do the bare-bones configuration required on each device to enable that possible.
I try and make this the only manual configuration I will ever do on these devices. After this, automation only.
The minimum configuration for SSH to work:
- IP Address on management port
- Local username/password
- Hostname
- Domain-Name
- VTY line settings
- Generate RSA crypto-key
Since every device is connected to my management network on the same interface (Eth0/0), I’ll just make a quick template in notepad. With that, I’ll only have to modify the hostname and ip address portion.
enable
configure terminal
!
ip routing
!
ip vrf MGMT
!
hostname ISP-RTR-A
!
ip domain-name willgrana.com
!
username cisco privilege 15 password cisco
!
interface eth0/0
 no switchport
 ip vrf forwarding MGMT
 ip address 192.168.1.221 255.255.255.0
 no shut
!
line vty 0 4
 transport input all
 login local
!
crypto key generate rsa modulus 2048
!
exit
!
I have configured all of these ports to belong in a VRF named “MGMT”, this is to keep my management traffic and addressing space completely separate from the lab’s routing table.
2.0 Ansible#
Ansible is an extremely popular open-source tool written on top of python that specializes in automating repetitive workloads. It utilizes extremely “human-readable” files for it’s operation, making it the perfect entry into the world of network automation.
We will be installing this tool onto our Ubuntu Virtual Machine
2.1 Ansible Install#
Install ansible using pythons “pip” package manager
python3 -m pip install --user ansible
Confirm Ansible in installed with:
ansible --version
Install Cisco IOS module for Ansible
ansible-galaxy collection install cisco.ios
Create a folder named “ansible” and create the following files
mkdir ansible
cd ansible
touch ansible.cfg
touch inventory
touch show-version.yml
2.2 Ansible Quick Test#
I will go much more into the basics ansible in later posts, but for now lets just do a quick test just to verify the whole setup so far.
We will be adding our hosts to the inventory file, then running a quick playbook that will retrieve and print the version of all hosts.
First lets add some quick configuration changes to ansible.cfg, these will override the global options set at /etc/ansible/ansible.cfg when playbooks are ran from this directory.
[defaults]
gathering = explicit
inventory = inventory
host_key_checking = False
[persistent_connection]
ssh_type = paramiko
Next, lets open up our inventory file and add in our hosts and a few variables
[routers]
ISP-RTR-A ansible_host=192.168.1.221
ISP-RTR-B ansible_host=192.168.1.222
CORE-RTR-A ansible_host=192.168.1.223
CORE-RTR-B ansible_host=192.168.1.224

[switches]
CORE-SW-A ansible_host=192.168.1.225
CORE-SW-B ansible_host=192.168.1.226
ACCESS-SW1 ansible_host=192.168.1.227
ACCESS-SW2 ansible_host=192.168.1.228
ACCESS-SW3 ansible_host=192.168.1.229

[all:vars]
ansible_user: cisco
ansible_password: cisco
ansible_network_os: ios
ansible_connection: network_cli
Create a simple playbook (show-version.yml) to execute and return “show ver” output on our devices
---
- name: Play #1 - execute show version across platforms
  hosts: all

  tasks:
    - name: “IOS - Execute show version"
      ios_command:
        commands: "show version | i Version"
      register: output

    - name: print output
      debug:
        var: output.stdout_lines[0]
Once again, I will go much more into detail regarding both the basics and advanced features of ansible in later posts
Finally, execute that playbook on your inventory file with the following:
ansible-playbook -i inventory show-version.yml
Expected output:
willgrana@ubuntu-vm1:~/ansible$ ansible-playbook -i inventory show-version.yml

PLAY [Play] ********************************************************************************************************************

TASK [“IOS - Execute show version"] ********************************************************************************************
ok: [ISP-RTR-A]
ok: [ISP-RTR-B]
ok: [CORE-RTR-A]
ok: [CORE-SW-A]
ok: [CORE-RTR-B]
ok: [CORE-SW-B]
ok: [ACCESS-SW2]
ok: [ACCESS-SW1]
ok: [ACCESS-SW3]

TASK [print output] ************************************************************************************************************
ok: [ISP-RTR-A] => {
    "output.stdout_lines[0]": [
        "Cisco IOS Software, Linux Software (I86BI_LINUX-ADVENTERPRISEK9-M), Version 15.4(2)T, DEVELOPMENT TEST SOFTWARE"
    ]

// ...
// ...
// Omitted for brevity.
// ...

PLAY RECAP *********************************************************************************************************************
ACCESS-SW1                 : ok=2    changed=0    unreachable=0    failed=0    skipped=0    rescued=0    ignored=0
ACCESS-SW2                 : ok=2    changed=0    unreachable=0    failed=0    skipped=0    rescued=0    ignored=0
ACCESS-SW3                 : ok=2    changed=0    unreachable=0    failed=0    skipped=0    rescued=0    ignored=0
CORE-RTR-A                 : ok=2    changed=0    unreachable=0    failed=0    skipped=0    rescued=0    ignored=0
CORE-RTR-B                 : ok=2    changed=0    unreachable=0    failed=0    skipped=0    rescued=0    ignored=0
CORE-SW-A                  : ok=2    changed=0    unreachable=0    failed=0    skipped=0    rescued=0    ignored=0
CORE-SW-B                  : ok=2    changed=0    unreachable=0    failed=0    skipped=0    rescued=0    ignored=0
ISP-RTR-A                  : ok=2    changed=0    unreachable=0    failed=0    skipped=0    rescued=0    ignored=0
ISP-RTR-B                  : ok=2    changed=0    unreachable=0    failed=0    skipped=0    rescued=0    ignored=0

willgrana@ubuntu-vm1:~/ansible$
Conclusion#
You have successfully set up a virtual network automation training lab environment!
We have now setup and verified functionality of our network automation environment, it is now the perfect platform for further studies and experimentation.
Thanks for reading!
-Will