Deploying an EVE-NG VM onto Azure with PowerShell
Table of Contents
Background#
EVE-NG is an extremely powerful application that allows you to create virtual networks emulating real equipment, allowing you to train or conduct proof of concepts without having to buy real hardware and listen to router fans all day. Learn More
Azure is a public cloud platform operated by Microsoft, comparable to Amazon’s AWS or Google’s GCP. You can pay for hardware usage by-the-second, allowing us to spin up Virtual Machines (VMs) as-needed, and just shut them down (stop paying for them) when we are done. Learn More
PowerShell is a scripting language created by Microsoft that allows for Command-Line-Interface (CLI) interaction with devices/services. We will use this to provision our Azure Virtual Machine and related resources without ever even opening up a web browser. Learn More
Objective#
Following this guide you will have a functional, globally reachable EVE-NG server in under 10 minutes. You can then leverage this resource for certification training, a sandbox environment for your team, or sharing labs with co-workers
Lets get started.
1.0 Provisioning Azure Resources with PowerShell#
1.1 Install Az modules#
Microsoft developed a PowerShell module specifically for interacting with Azure resources. We will need to install the Azure modules into PowerShell before we can begin. Run the following commands:
Set-ExecutionPolicy -ExecutionPolicy RemoteSigned -Scope CurrentUser
Install-Module -Name Az -Scope CurrentUser -Repository PSGallery -Force
1.2 Login to Az#
We have the module, now we need to authenticate our powershell session with Azure. This code will open an interactive window with Azure where you will be prompted to authenticate. Click here to make a new account with Azure if you don’t already have one.
Connect-AzAccount
1.3 Create Resource Group#
We will now create our resource group. This is simply an organizational object that will keep all of our related resources together in one group
New-AzResourceGroup -Name 'cloudlab-rg1' -Location 'EastUS'
1.4 Create and Configure VM + Resources#
The code we are about to run will create/configure a Ubuntu 20.04 VM and all of the prerequisite resources needed behind the scenes, including:
- a public IP
- a virtual network
- a network security group (access control list)
- a persistent drive.
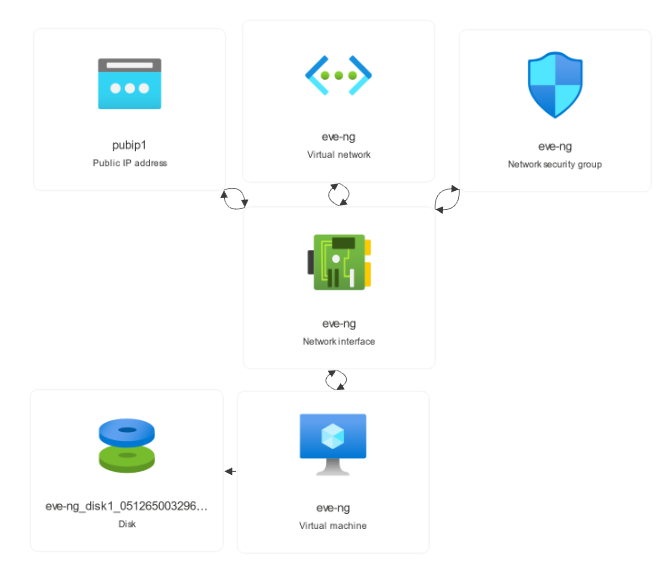
Azure Resources Visualized
Since we will only have the VM running when we are actively using it, this implementation will be very cheap. As of February 2023 the cost per hour/month for the resources created below are as follows:
- Standard_D2s_v4 VM = $0.09/hour
- PublicIP = $2.63/month
- S4 LRS Disk = $1.54/month
So, minimum monthly cost if we leave everything up except the VM is around $4, then add 9 cents for every hour you have the VM running.
Not bad!
First, lets create all of the resources above using the New-AzVm module
#This will create and configure your VM, vNet, vNic, Public IP, Disk, and NSG
New-AzVm `
    -ResourceGroupName 'cloudlab-rg1' `
    -Name 'eve-ng-vm1' `
    -Location 'eastus' `
    -Image canonical:0001-com-ubuntu-server-focal:20_04-lts-gen2:latest `
    -size Standard_D2s_v4 `
    -PublicIpAddressName 'eve-ng-ip1' `
    -VirtualNetworkName 'eve-ng-vnet1' `
    -SecurityGroupName 'eve-ng-nsg1' `
    -OpenPorts 80,22
You will be prompted to input user credentials for the soon-to-be created VM. If the password does not meet complexity requirements, the job will fail.
EVE-NG uses TCP ports 32769-32800 to facilitate your ability to telnet directly from your client PC to the emulated network devices. We will now modify the existing NSG to add an entry which will allow incoming traffic on those ports.
#Below we are going into the newly created NSG and adding in a rule to allow the ports needed-
#-to be able to telnet directly from your client to the emulated network devices
$networkSecurityGroup = Get-AzNetworkSecurityGroup -Name eve-ng-nsg1 -ResourceGroupName cloudlab-rg1

Add-AzNetworkSecurityRuleConfig `
    -Name eve-ng-telnet `
    -NetworkSecurityGroup $networkSecurityGroup `
    -Description "Allow telnet over specific ports" `
    -Access Allow `
    -Protocol Tcp `
    -Direction Inbound `
    -Priority 300 `
    -SourceAddressPrefix * `
    -SourcePortRange * `
    -DestinationAddressPrefix * `
    -DestinationPortRange 32769-32800
# Confirm Changes
Set-AzNetworkSecurityGroup -NetworkSecurityGroup $networkSecurityGroup
Finally, we will tell Azure to run the following command on the newly created VM. This command will download and execute the official eve-ng installation script. This script takes about 8 minutes to install/reboot.
Invoke-AzVMRunCommand `
    -ResourceGroupName 'cloudlab-rg1' `
    -VMName 'eve-ng-vm1' `
    -CommandId 'RunShellScript' `
    -ScriptString 'wget -O - https://www.eve-ng.net/focal/install-eve.sh | bash -i' `
    -AsJob

#Output your VM's URL into the terminal
(Get-AzPublicIpAddress -ResourceGroupName cloudlab-rg1 -Name eve-ng-ip1 ).DnsSettings.Fqdn
After this, you will now see your VM’s Fully Qualified Domain Name (FDQN) at the bottom of the terminal. This is what you will use to Web-GUI/SSH into your EVE-NG server.

Successful Output
On the highlighted line above, we can see that the FQDN of our new VM is: eve-ng-vm1-2f1361.eastus.cloudapp.azure.com
2.0 Test Your New Server#
2.1 Login#
After your system runs through the installation script and reboots ( takes about 8-10 minutes ) you should see the EVE login screen when you go to the public IP of your VM via a web browser.
http://eve-ng-vm1-2f1361.eastus.cloudapp.azure.com
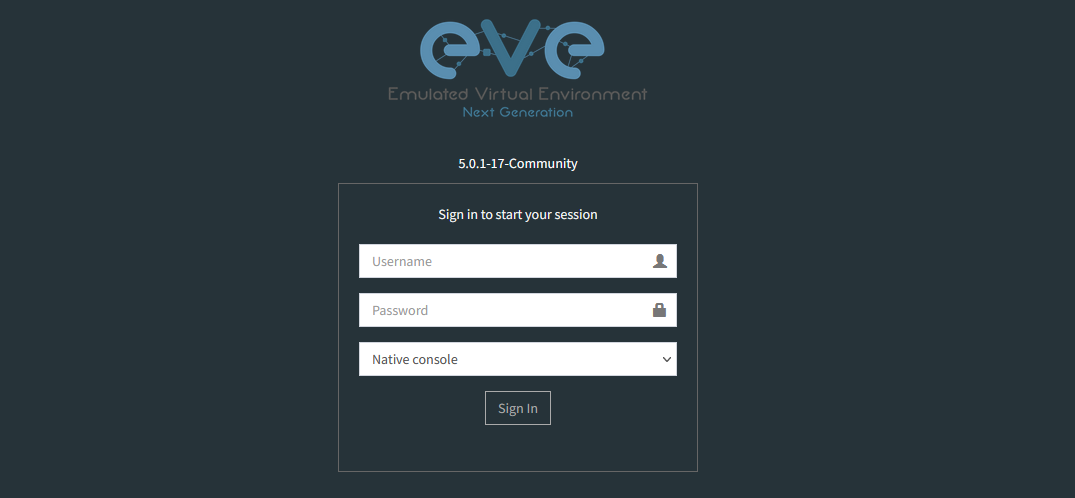
Default Credentials:
- Username:
admin - Password:
eve - Change the drop down from
Native consoletoHtml5 console
You need to install the EVE-NG client pack if you eventually want to use Native Console. It will allow you to telnet into emulated devices with Putty/SecureCRT running on your PC, as opposed to an HTML5 Client
2.2 New Lab#
Select the “New Lab” button, give it a name, and hit ‘Save’.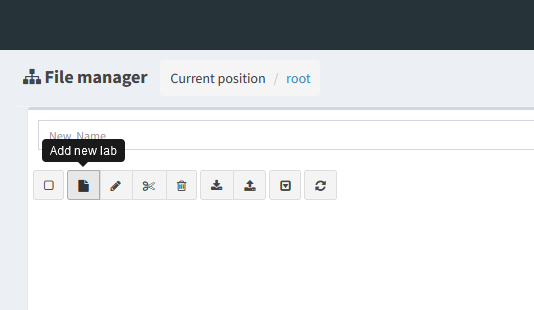
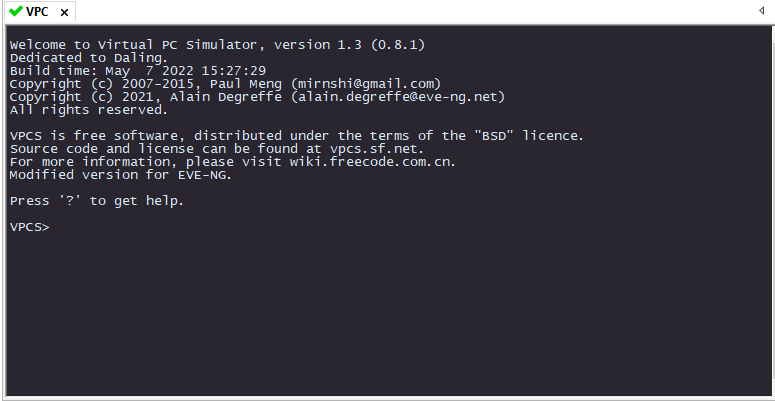
2.3 Testing a Node#
- At the top of the menu on the left side, select the “+” icon to add a new node.
- At the drop-down, select “Virtual PC (VPCS)” and create
- Right click the node and select “Start”. It should turn blue
- Double Click the node and ensure your chosen method of console (Native or HTML) is functional
Conclusion#
Now that we have EVE-NG installed and globally accessible via Azure, we can now start using the emulation software to:
- Create labs to learn certification exam topics
- Share our server with co-workers and friends
- Test solutions in a lab environment before implementing them on a real network
In following posts I will demonstrate other tasks such as how to add device images, import labs, and build a site-to-site vpn from EVE-NG to your house!
Thanks for reading!
- Will
# Command to start your VM
Start-AzVM -ResourceGroupName cloudlab-rg1 -Name eve-ng-vm1 -AsJob -Force
# Command to stop your VM
Stop-AzVM -ResourceGroupName cloudlab-rg1 -Name eve-ng-vm1 -AsJob -Force